

Backpacking the NaPali Coast: Guide to the Kalalau Trail
Kalalau Trail Overview:
- Distance: 22 miles (11 miles each way)
- Trail Type: Out & Back
- Elevation Gain: ~5,000 feet (each way, so 10,000 total)
- Trailhead: Ke’e Beach, Na Pali Coast State Park, KauaiGetting To the Na’Pali CoastThe Na’Pali Coast lies on the Northwestern side of Kauai, Hawaii. To get here, fly into Lihue Airport (LIH) in Kauai and then it’s a 1 hour and 15 minute drive from the airport to the trailhead.
Getting To the Na’Pali Coast
The Na’Pali Coast lies on the Northwestern side of Kauai, Hawaii. To get here, fly into Lihue Airport (LIH) in Kauai and then it’s a 1 hour and 15 minute drive from the airport to the trailhead. Be careful with your time and when you want to start your hike, certain hours of the day could take 2 hours to get to the trail head if leaving around normal working hours (8am to 10am) there is only one road that goes around the island and so traffic can be slower then expected and backed up a little if there is any road construction.
Day Hiking the Kalalau Trail
You do not need a permit for a day hike along the Kalalau Trail, however without a permit you are only allowed to hike the first 2 miles in to Hanakapi’ai Beach. From here, you can also do the 4 mile roundtrip detour trail to Hanakapi’ai Falls. When doing the day hike, you will not be able to get a parking permit so will need to make arrangements to catch the shuttle. (see info below)

How to Get Permits for Backpacking the Kalalau Trail
While the hike itself is hard, getting permits to actually be able to hike the Kalalau Trail is a challenge in it’s own way. Backpacking the Napali Coast has become popular over the years, especially as it’s grown in ranking as one of the best backpacking routes in the world! Because of this, it can be difficult to get permits.
Kalalau Trail permits to backpack the Napali Coast come out 90 days in advance on the State of Hawaii website. It costs $35/person per night. The permits sell out in seconds, so make sure you are online right as they become available!
If you are having trouble securing a permit, you can always sign up to track for cancellations on Outdoor Status. You simply input your preferred dates and size of your party, and then they will text you if a cancellation opens up (at which point, you get online right away and snag it).
Parking Permits for Overnight Parking at the Trailhead
In addition to your backpacking permits, you also need to secure an overnight parking permit for Haena State Park if you plan to drive to the trailhead and leave your car there overnight. You pay per day that your car will be there (so if you are doing a 1-night backpacking trip you will need to pay for 2 days). It cost $40 for 2 days. You can only reserve your parking permit after you secure your backpacking permit.
Alternatively, you could make a reservation on their shuttle system which runs every 20 minutes and costs about $15/person. Learn more about the shuttle here.
Packing List for Backpacking the Napali Coast
- Hiking Boots (These are my favorite!)
- Cliff Bar Energy (energy on the hike)
- Dehydrated Meals (this one is my favorite brand, we also loved the beef stroganaff)
- Sleeping Bag (This is similar to the one I have used for years that I love!)
- Nano Puff Jacket (I bring this on EVERY camping trip. It packs up small and keeps you warm!)
- Travel Towel (perfect for backpacking!)
- REI Half dome Tent (offers more room then the quarterdome but both are great)
- Inflatable Sleeping Pad (this is the one that I use)
- Camelbak
- Portable phone charger (will charge your phone 4 times, so you’ll have enough to take pics!)
- Osprey Aura 65L (I’ve used other packs but this one has the best pockets to stay organized!)
- Jetboil – this is a game-changer. Boils water in under 90 seconds, wouldn’t use anything else
- Water Tablets – easy to fill up on a stream and not having to wait around and pump the water
- MSR Water Filter – one of the best products for filtering drinking water on the trail!
- Ultralight First Aid Kit
- Water Shoes (i usually just walk barefoot across rivers or my flipflops but these are good water shoes if you want to use some)
- Hiking Poles

Where to Stay Before Backpacking the Napali Coast
We stayed at The Kauai Inn in Lihue. Our flight was getting in late on Christmas day and we didn’t want to try and find anything open to get snacks and a few odds and ends up north as it’s more remote up there. But The Kauai Inn was perfect for us. It has an old school quaint charm to it, and you can’t beat the prices! Has a cute pool area, lot’s of places to sit and enjoy the warm Hawaii air, and a place to sit get drinks and visit with other travelers. The other thing I LOVED about staying here is the staff was excellent! We wanted to begin our hike the early morning the day after we arrived at night and instead of having to go hunting for camping fuel for our stove (remember you can’t fly with this in carry on OR checked bags) so we made up a little box of our fuel cannister and made arrangements to ship it to the hotel, where they held it for us until we checked in. When I showed up and gave them my name to check in they handed me the box without be even having to ask for it! Took some stress out of the journey and can’t recommend staying here enough for a quick overnight before the hike.

Bag Storage
One thing you may not of thought about, because we didn’t, was storing your other bags while on the hike. We have been told over and over that if you are leaving your car at the parking lot trail head, it will most likely get broken into and things stolen so don’t leave anything in your car. We assumed our hotel that we were checking into after the hike would do a conceige storage for us and they didn’t. A lot of places in Kauai don’t for some reason, maybe its because they have open air lobby’s, but it was a huge problem for us. We were scrambling around the morning at 7am when the Hilton told us they wouldn’t keep our bags, and LUCKILY we found Elite Baggage Storage and they came to the last minute rescue! Aimmee (I think that was her name) will come pick up your bags (or smarter would be to schedule a time to meet here and drop them off in Lihue when you are there) but by this point we were in Princebville, so we dropped our bags as the Wyndham who kept them for an hour, and Elite Storage came up and grabbed them. We were able to pay when we got done with the hike 2 days later and she came and met us at our Hotel in Kaapa. LIFE SAVER, and a smart idea since leaving stuff in cars is a recipe for break ins. Check her out Elite Baggage Storage. Also, pro-tip, open the glove box and put the back seats down so lookers can see there is nothing in the car and won’t bother breaking a window. We didn’t see any cars broken into but we have been told multiple times it is a problem.
Backpacking the Napali Coast – Everything You Need to Know
The first thing I’ll say is: backpacking the Kalalau Trail is epic and beautiful, but do NOT underestimate this hike just because it’s a coastal trail. I’ve hiked big mountains and longer hikes and this one was harder. Not because of the elevation gain, but the terrain. We had rain half the hike on both days and the trail is exceptionally muddy. Even if it didn’t rain that day, it would have been muddy from the day before so that makes it extremely slick in places and impossible to keep your feet dry and blister free. So be aware that the hike will be harder then you are thinking depending on the weather. Even if it predicts sunny days, the northern coast of Kauai basically creates its own weather patterns and is a rain producer for the Napali Coast. Just to give you an idea, it rains on average 40 inches a year in Seattle, but 400 inches a year in the Kauai mountains and above the coast.
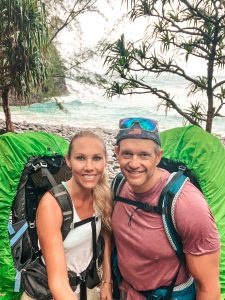
On this hike there’s jaw-dropping views at every turn, weaving in and out from coastal views to jungle interior. But, you are constantly gaining and losing elevation, and the trail can seem relentless at times. I’ve done plenty of epic backpacking hikes, but this one truly was more difficult than I expected! I’ve never used hiking poles but had I not had them I don’t think I could of done this hike, they were a life saver to help not slide off the trail in mudslides and cliff sections.
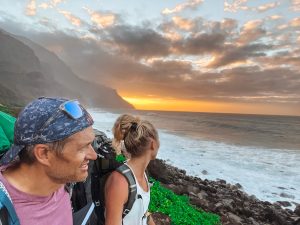
With our hike, we started at about 9 am and got to Kalalau Beach just before sunset at 5:30pm, taking just over 8 hours total each way. I did stop to take a lot of pictures, and we did take a snack break, but we also carried a good pace most the way. Don’t underestimate how long this hike will take. My husband laughed when I said it will take 8 hours and he was shocked when it did.
That being said, it’s still TOTALLY worth it and I think every hiker should experience this trail. Making it all the way to Kalalau Beach and setting up camp with an ocean view is the most rewarding feeling!
Kalalau Trail Hiking Guide

The First Half of the Trail
The first mile starts out uphill on a rocky dirt path (or muddy… if it’s rained recently) before descending down on some makeshift stairs along the path. You’ll likely see several other people on this part of the trail, since this is the part that day-hikers can do. About an hour after starting, you’ll reach your first big stream crossing (I recommend taking shoes off to cross to keep shoes dry) before arriving at the beautiful Hanakapi’ai Beach. Take a bathroom break at the compost bathrooms they have here, fill up your water if needed, and take a quick rest by the beach before continuing on. Here, you have the option to take a 4-mile roundtrip detour to Hanakapi’ai Falls (I don’t recommend doing that though, save your time & energy for the 9 miles you have left!).
Continuing on the Kalalau Trail from here, you lose the day-hiker/tourist crowds and the trail becomes much more quiet.
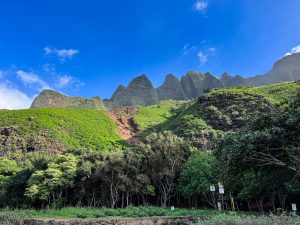
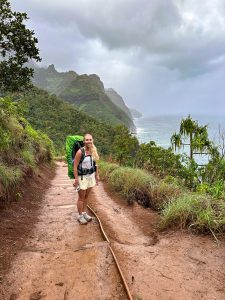
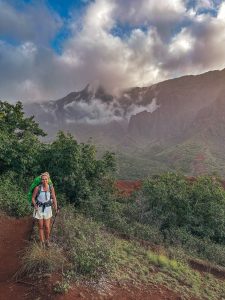
The next 5 miles are when it starts to get more challenging, as you weave in and out of the coves. The coastal views are amazing, but in this first section they are brief and limited. The trail is narrow almost this entire hike, and the plants are overgrown but not to the point I would of wanted pants, I think pants would be sticky if its hot and sticky if its raining… totally miserable and the plants that scape your legs don’t scratch them they just brush by mostly. Maybe its different in the summer but the winter, shorts all the way.
At Mile 6, you’ll reach Hanakoa Valley. This is a spot where you can camp if you want to break up the hike (there is no ocean view from this area, it’s in the jungle/forested side). I recommend just hiking all the way to Kalalau Beach if you have the energy for it, since the views and the vibes are much better over there!
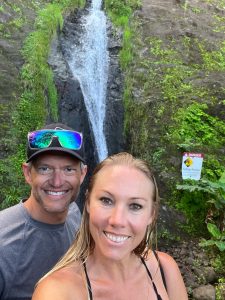
At Hanakoa Valley you’ll find more compost toilets and a big stream to filter water. You can also opt to take a 1 mile roundtrip detour to the Hanakoa Falls.
The Second Half of the Trail
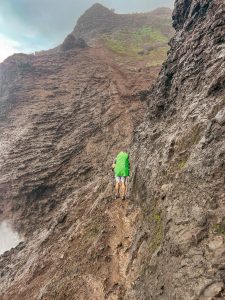

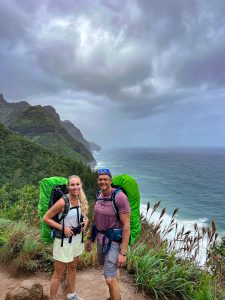
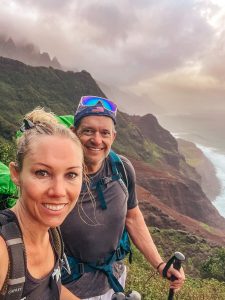
At Mile 7, things start to open up and its GORGEOUS!!! This second part of the trail brought me to tears. Thats not to say that things don’t get interesting for a little bit at mile 7! This is when the trail gets more exposed, and you get to go over the infamous “Crawler’s Ledge”. Crawler’s Ledge, starting right at the 7-mile mark (you’ll see a rock with the number “7” etched in and painted, marking the start of it) is a narrow part of the trail that has a cliff drop-off with the ocean below you. Don’t over think this area, I usually have a hard time with hikes that have cliffs, but this one was totally fine, the trail isn’t extremely narrow and the cliff part is on solid rock so less likely to slip if you go slow. The part that had me a little concerned with the mud slide section just before the cliff, as it was super slick for us going up and down and if I didn’t have poles I would of been pretty dang scared. So take poles! But this is the start of the last half of the trail (starting at mile 7)and it is my favorite part of backpacking the Napali Coast.
You’ll still be hiking along a narrow, cliff-side, exposed trail through mile 8 as well. Also, while the trail is super straightforward and it’s very hard to get lost, we did have some trouble with some of the stream crossings finding the right trail after we crossed and somehow got off the trail twice, so be mindful and look for the trail before you cross so you know where your going and not taking other forged trails from other lost stream crossing souls. Some people will down load a gps map before they go (theres not service along this side of the trail) but trail is relatively easy to follow.
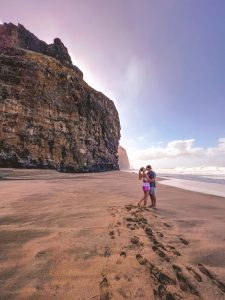
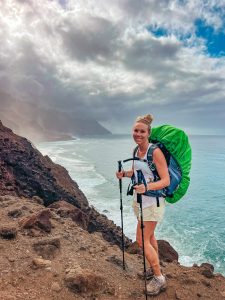
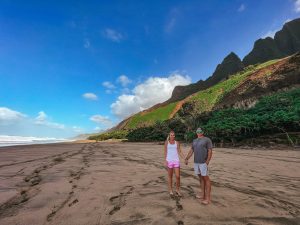
At mile 10, you’ll see the trail open up with an exposed, red dirt hill. There is a sign for Kalalau and get your cameras ready it is a Jurassic Park scenic moment! So so pretty you need to take pictures! This is the start of your descent into Kalalau Beach! You’ll cross one more big stream before entering into the campground area. Once you get there, there are plenty of campsites to choose from nestled under the shade of trees at the back of the beach.
Camping at Kalalau Beach
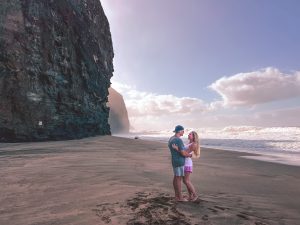
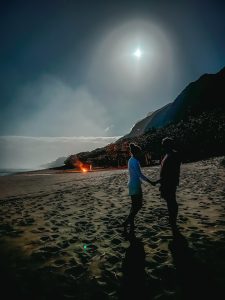
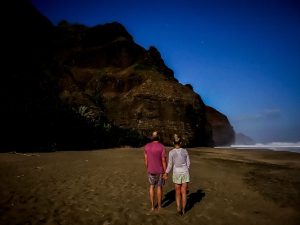
There is quite a community feel to the campground area at Kalalau Beach. Everyone has completed this trek and earned their campsite after an 11-mile trek! The vibes are great, everyone is friendly and just stoked to be there. Side note, the first night we set up our tent on the beach, probably 50-75 feet away from where the debri was from the tide. However, it was a full moon and we got lucky as the tide came up just 20 feet from our tent door. Yikes! So we moved back to under the trees our second night, was less stressful then watching the tide all night!
Set up camp, go swimming in the ocean if the waves are not to crazy like they were for us, walk along the beach. There are some sea caves to explore at the edge of the beach. The views from the beach looking back at the mountains with the waterfall crashing is just insanely beautiful and unique. That waterfall is also the closest water source to filter more water while you are camping. People also shower off in this waterfall – there are PVC pipes laying next to it that you can use to press up against the waterfall to create a sort of “showerhead” from.
We spent 2 nights at the beach so we could have one day to enjoy the beach and get a little rest. If you could only go for one night thats totally ok, just try to get to the beach for sunset and can enjoy the views!!
Post hiking dinner recommendations
After a long hike, its always fun to treat yourself to a really big dinner. While I’ll admit our first stop was at McDonalds to get a large Diet Coke and some salty fries, we wanted to do dinner that had local Hawaiian good food! Boy did we hit the jackpot. We went to the Lava Lava Beach Club at the Kauai Shores Hotel and the food was to die for! Toes in the sand, dining under the stars and cute white lights, and pineapple chicken fried rice served inside of an open face pineapple and the Huggo’s teriyaki steak hit the spot!!

Other notable places we ate include a Pukka dog down by Poipu Beach (don’t go during lunch there will be long lines) we thought they were good and fun because different but wouldn’t stay in line for them. And we also had Chicken in a Barrel and the chicken was the best cooked chicken we’ve had in a long time!
Happy Trails!